
This quick guide will help you stop resin prints from falling off supports. If your prints are sticking to the FEP and not the build plate, that is a different issue and we have an article on how to help keep resin prints on the build plate.
If your print keeps detaching from the supports and ending up on the FEP, the vast majority of time this can be solved by making a few simple changes. Beyond the common suggestions of releveling the bed and adjusting the FEP, here are a few things for you to do:
1. Reinforce the supports
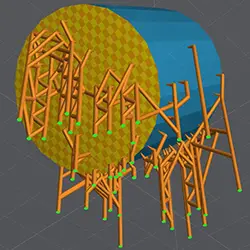
Supports that are inadequate in density or thickness will allow the print detach. It can take plenty of practice to determine what an optimal level of support entails. The picture below showcases how the auto-support function attempts to reinforce the print.
Lights supports, especially on larger objects, provide very little surface area for bonding. However, on small delicate prints, using only light supports may prove sufficient.
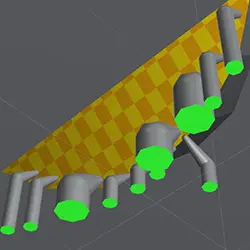
For larger parts such as this cylinder, it is best to start with a strong base. Heavy supports provide the best reinforcement but they can result in divots or craters on the print. We typically use heavy supports on the first few layers.
Medium supports should be the primary type on most prints. These provide good reinforcement, and should be placed at all initial areas of contact, including islands.

Generously spread medium supports around the part, attempting to place them adjacent to each other so they can be braced in the next step. Lights can also be used to generate braces.
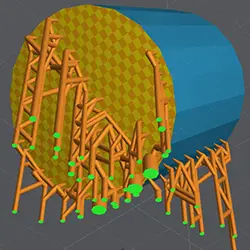
Finally, assigning parents to supports reduces the amount of resin used, and adding braces between the support pillars minimizes flexing during printing.
Looking back at the auto-supports function used on the first image, we can compare and conclude that beefing up the support density and thickness will prove to be more reliable.
2. Raise your exposure
Especially on older non-monochrome printers, the exposure can be increased to allow the resin to properly cure and bond. For example, a resin that you would normally print at 1.5 seconds can be increased to 2 seconds. This would improve the bond at the expense of some detail due to overexposure.
You can find ideal resin print settings for most resins in our table. As a warning, setting the exposure exceptionally high can leave indentions in the FEP - an example of this is using a 10 second exposure on a monochrome printer.
3. Lower your lift speed
A high lift speed will increase the acceleration of the motor, thus increasing the force on the bond between the resin and build plate. Reduce the lift speed to a baseline such as 60 mm/min (1 mm/sec). Thereafter, once you have successful prints, you can optimize and raise the lift speed as you see fit.
Disclaimer: You assume all responsibility and risk for the use of, but not limited to, the resources, advice, and opinions of 4D Filtration or its employees. 4D Filtration or its employees do not assume any liability or create any warranty for the use of any information. 4D Filtration may receive commissions for referral links. Prices are approximated for simplicity and they may fluctuate due to sales or markdowns. Amazon .com should refer you to your local amazon site if you are not in the United States; there is a chance Amazon's link redirect system will take you to a different product.