This unit is in no way a replacement for proper ventilation that is HIGHLY recommended in any resin setup - it is supplemental to a setup by assisting to contain 'fumes' at the source.
Follow the links for Preparing for Resin Printing - Ventilation Guidance - Safety FAQ
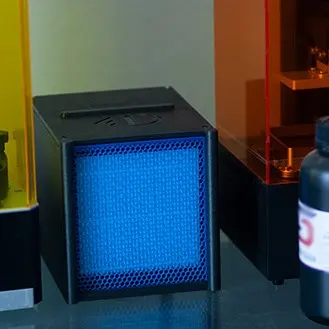
The Promethean fume extractor is designed for FDM and resin 3D printing. This extractor pulls air through a MERV 13 filter and activated carbon granules.
The MERV 13 filter is ideal for capturing nanoplastics generated from FDM printers. The activated carbon mitigates fumes from FDM and resin printers - place emphasis on mitigation since carbon typically has efficiencies of 40-60%.
The Promethean files are released for non-commercial use (don't make and sell these). A sourcing & build guide is provided below.
DIY
- Download STLs & print off the files
- Source 120 mm fan
- Optional PWM module
- Source AC-DC adapter
- Source MERV 13 filter & Optional foam seal
- Print/Source reusable cartridge & Source activated carbon
- Optional duct hose & adapters
Assembled
- Unit arrives prebuilt with parts
- Includes 120 mm fan
- Includes PWM module for fan speed control
- Includes 12 VDC, 24 W AC-DC adapter
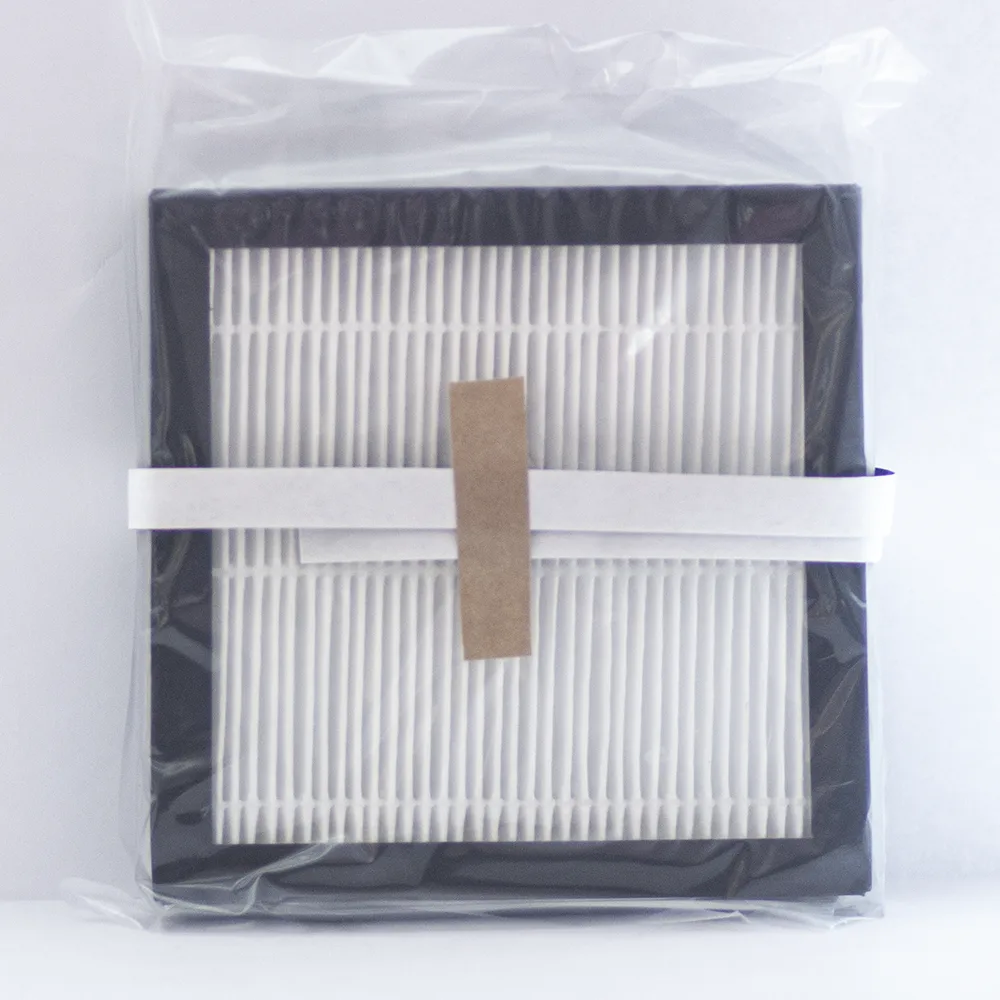
- Includes MERV 13 filter (x1) & foam seal
- Includes reusable cartridge preloaded with activated carbon
- Includes duct hose (4 ft) & adapter

Specifications
| Free Flow Rate | 28-63 cfm |
| MERV 13 Filtration Rate | 13-38 cfm |
| MERV 13 + Carbon Rate | 11-27 cfm |
| Grate Face Velocity | 160-350 fpm |
| Duct Face Velocity | 350-850 fpm |
| Sound Level @ 1m (3ft) | 41-68 dB |
| Sound Level @ 3m (9ft) |
38-64 dB |
| Dimensions | 8.8x6.6x6.3 in |
| Supply Voltage | 12 V |
| Power Consumption | 2.6-18.4 W |
*Specs based off a 120 mm, 178 CFM, 0.94 inH2O, 4,200 RPM, ≈18 W DC fan.
Component Sourcing
| Required? | Category | Component | Specification | Quantity | Source 1 | Source 2 | Source 3 |
| Required | 3D Print | Housing & Accessories | PLA Recommended | ≈600 g | Prusament | Eryone | Polymaker |
| Required | Electronics | 120 mm Fan | 12 VDC | 1 | 4D | AliExpress | Amazon |
| Optional | Electronics | PWM Module | 12 VDC - 3 A Max | 1 | 4D | ||
| Required | Electronics | AC-DC Adapter | 12 VDC - 24 W | 1 | 4D | Amazon | Mousers |
| Required |
Filtration |
MERV 13 Filter |
6 x 6 x 1 in (150x150x25mm) | 1 | 4D | 4D (eBay) | Home Depot |
| Optional | Filtration | Filter Foam Seal | 1/2 x 1/16 in (12.7x1.6 mm) | 24 in | McMaster | Amazon | AliExpress |
| Required | Filtration | Carbon Cartridge | Option #1 - Buy | 1 | 4D | ||
| Required | Filtration | DIY Cartridge - Resin | Option #2 - Build | ≈120 g | |||
| Optional | Filtration | Cartridge Seal - Silicone | Comes with cartridge | 1 | 4D | ||
| Optional | Filtration | Housing EPDM Seal | 1/16 in (1.78mm) Diameter | 24 in | McMaster | Amazon | |
| Required | Structural | Fan Screws | #4-40 (M3) 2 in | 4 | Bolt Depot | ||
| Required | Structural | Fan Hex Nuts | #4-40 (M3) | 4 | Bolt Depot | ||
| Required | Structural | Lid Screws | #4-40 (M3) 1/2 in | 3 | Bolt Depot | ||
| Required | Structural | Lid Heat Inserts | #4-40 (M3) | 3 | 4D (eBay) | Amazon | AliExpress |
| Optional | Misc | Magnets | 1/4 x 1/4 x 1/8 in (6x3mm) | 4 | Applied Magnets | McMaster | Amazon |
| Optional | Misc | Felt Discs | 1/2 in Diameter, 1/8 in Thick | 8 | McMaster | Amazon | |
| Optional | Misc | Duct Hose | 4 in Diameter (100mm) | 3 ft+ | 4D | AC Infinity (Amazon) | Vivosun (Amazon) |
| Optional | Misc | Zip Ties | 16 in (400mm) | 2 | Amazon | AliExpress |
- The 120 mm fan can be AC or DC, any thickness, 2-4 wire, and any voltage. The 38 mm thickness fans are generally designed for higher static pressure, which is needed to pull air through filter media. Any 2-wire fan is acceptable, but 4-wire fans can be controlled with PWM. The voltage can be whatever you would like, but it does need to match the power supply - 12 VDC is recommended due to the wide availability of components.
- Make sure that the power supply matches the voltage and is rated for the wattage of the fan.
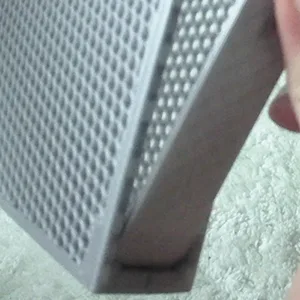
- Small MERV and HEPA panel filters are uncommon. To our knowledge, we sell the highest-rated MERV 6 x 6 x 1 filter. There are MERV 7 and 9 filters of this size on Amazon and McMaster, but the efficiencies of these panels are substantially lower than MERV 13. You have the option of taking larger panels and cutting them to size - if you do this, the filter needs to be sealed properly. We use MERV instead of HEPA by default since it allows for more airflow, allowing use as a normal air cleaner and a fume extractor. HEPA filter media can be more efficient if the primary use is as a fume extractor.
- Not Internally Tested - "T2mm x W15mm" should be the most appropriate. These metric-sized adhesive foam strips are just slightly thicker than their imperial counterparts.
- Not Internally Tested - using M3 screws, nuts, and heat inserts is perfectly fine, just make sure to match the components.
- Not Internally Tested - imperial or metric disc magnets can be used, but they may need a very small amount of adhesive to prevent sliding or ejection.
- The "5x400mm" zip ties are an appropriately sized substitution. Zip ties used to secure the duct to adapters.
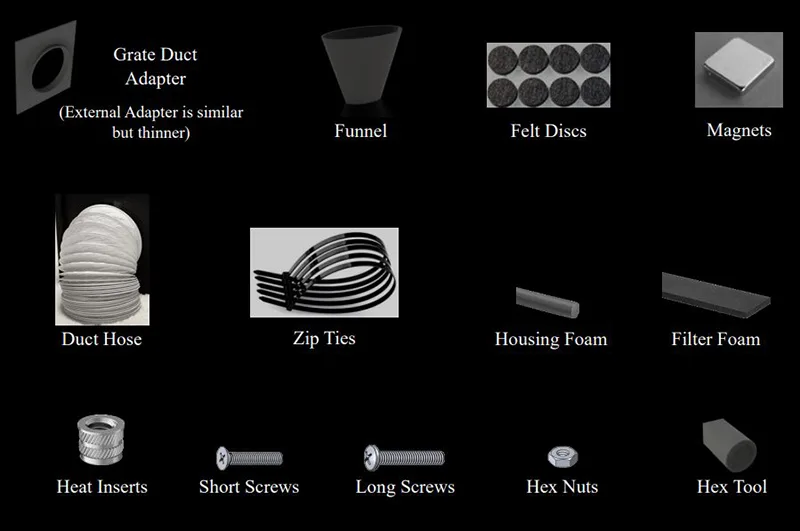
3D Printed Parts
| Required? | Component | Quantity | Estimated Material |
| Required | Housing | 1 | 400 g |
| Required | Front Lid | 1 | 60 g |
| Required | Back Lid | 1 | 40 g |
| Optional | Grate | 2 | 20 g |
| Optional | Grate Duct Adapter | 1 | 50 g |
| Optional | External Duct Adapter | 1 | 25 g |
| Optional |
Cartridge Funnel | 1 | 7 g |
| Optional | PWM Hex Tool | 1 | 3 g |
| Required if DIY | DIY Carbon Cartridge | 1 | 120 g (resin) |
Need help sourcing or putting it together?
Want to show off the final look?
How To Build The Promethean Air Cleaner

Printing The 3D Parts
- To make the printing experience as easy as possible, we have supplied 3MF and GCODEs for each part. We Highly Recommend using PrusaSlicer and loading the 3MF files into the software to have optimized settings.
The GCODEs use a nozzle temp of 215°C for PLA and 240°C for PETG.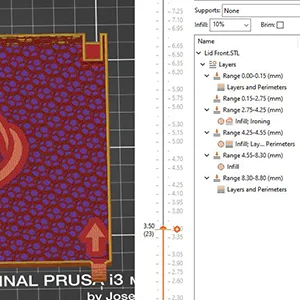
- Most of the prints are fairly quick, but the housing is quite large and will take ≈30 hours. We recommend sticking with PLA and having an enclosure to minimize warping on corners. Any warping that does occur typically is small and should not affect the functionality of the air cleaner. We recommend using a build plate adhesive like Vision Miner's Nano Polymer Adhesive (Amazon Link) on the corners of the print to eliminate warping.
- The carbon cartridge is printed on a medium-sized resin printer due to the complex geometry and size - there are nearly 7,000 hexagonal holes to allow airflow. This STL can be inserted into a resin slicer like Lychee or Chitubox. The cartridge should be printed directly on the built plate. The cartridge is chamfered on the bottom to mitigate elephants foot and make removal easier.
Currently, we recommend using a durable resin for the cartridge - brittle resin will likely break during removal from the plate or during cleaning.
The layer cure time should be 20%+ higher than normal to ensure rigidity while printing. For example, on an Anycubic Mono X at 80% UV power, SuperPP prints well at 1.3-1.6 s per layer at 30°C with a base layer time of 4 s and a lift speed of 30-60 mm/min. You can use similar settings on most monochrome printers.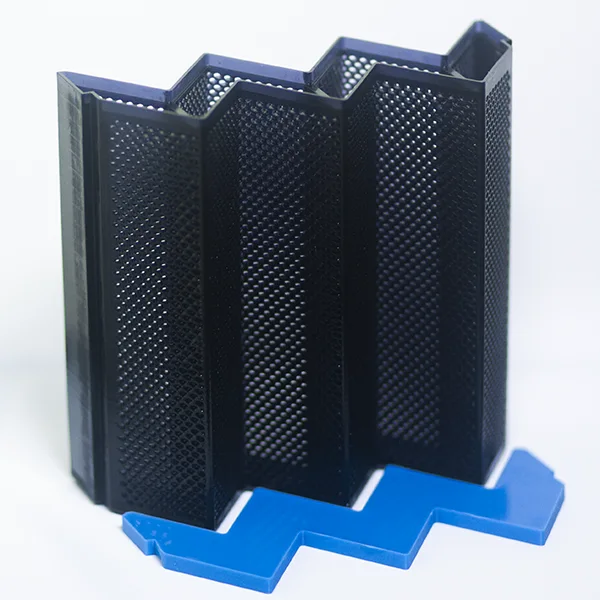
- The carbon cartridge, depending on the resin and settings used, can be delicate - it should be carefully removed and handled while cleaning. For removal, you can start by scraping/lifting the print from a corner and working towards the middle. This can be one of the harder prints to remove.
The recommended method of cleaning is squirting or a quick dip in clean IPA followed by ≈1 minute in an ultrasonic cleaner. If you do not have an ultrasonic cleaner, then the squirting/dip will need to be repeated several times.
A fan, hair dryer on low heat, or compressed air can be used to remove the cleaner/solvent from the mesh. You may need to repeat the cleaning and drying process a few times to remove all of the uncured resin. Do not use a heat gun as this can warp and melt the mesh.
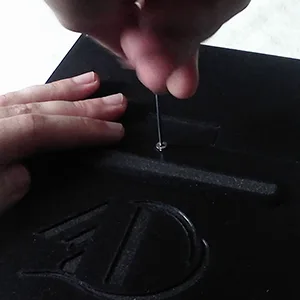
Heated Inserts
- Take a threaded insert and place it upright on the three housing holes.
- Use a fine-tip soldering iron to push the inserts into the housing - be quick so as not to overheat the plastic.
- Make sure the inserts are flush or below the housing. While hot, you can use one of the long screws to align the inserts if needed.
Installing Magnets
- Take an exacto knife or flat head screwdriver and clear out any overhangs inside the magnet slots on the housing.
- Place two magnets inside of the housing slots. You can use a flat head screwdriver to help push the magnet inside. If the magnets you are using are undersized, it is recommended to use a small amount of adhesive to prevent sliding or ejection. We like using Gorilla Super Glue Gel.
- Identify the polarity of the remaining two magnets by placing them on top of the housing magnets. These should be placed inside the front lid in the orientation where they attract. This will keep the lid down during use without the need for screwing on the lid.
Housing Seals
- Take one end of the EPDM cord stock and place it into the long housing slot. Use an exacto knife or scissors to cut the cord, The recommended cord stock should be snug - adhesive can be used to secure the cord in place. Repeat this for the other side.
- Take the remaining cord stock and place it into the smaller perpendicular sections. The cord stock will help prevent air from entering through the lid.
Felt Discs
- Take four of the felt discs and place them along the fan mount. These provide light vibration suppression.
- Take the remaining four felt discs and place them at the bottom of the housing.
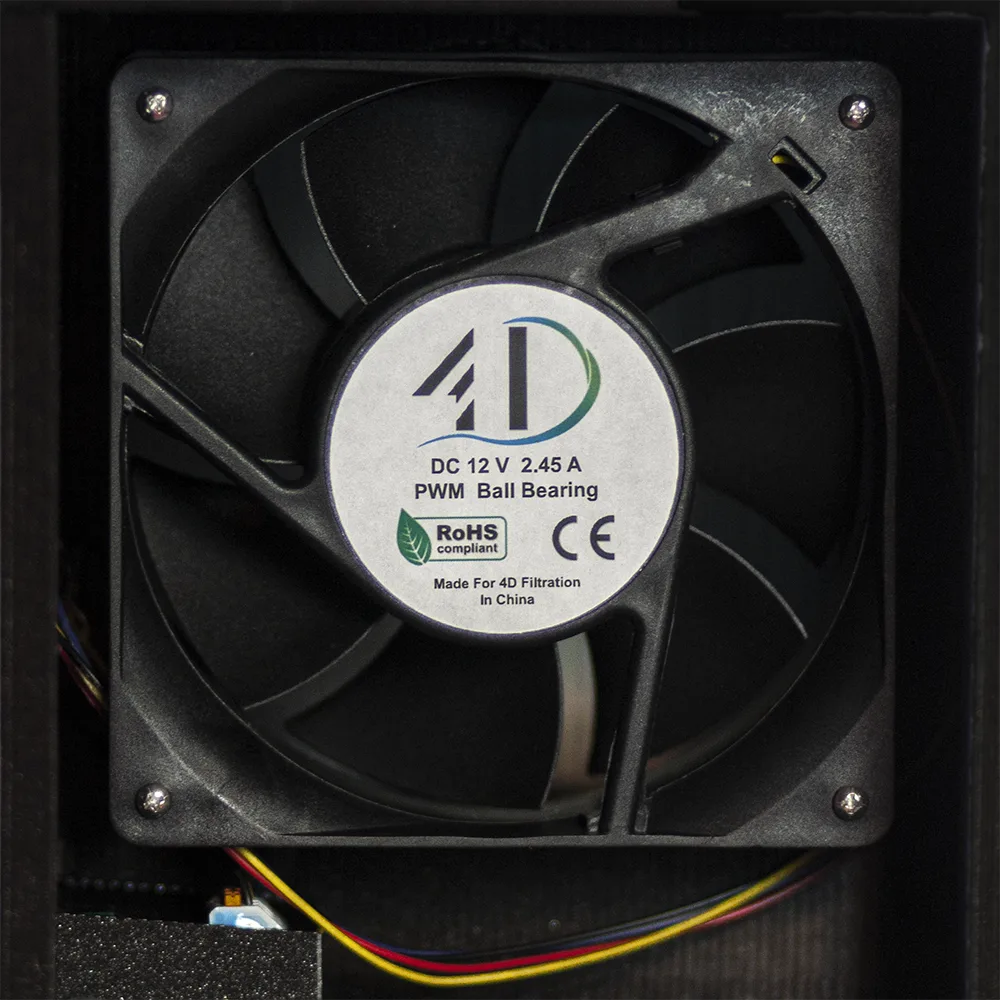
PWM Fan Controller
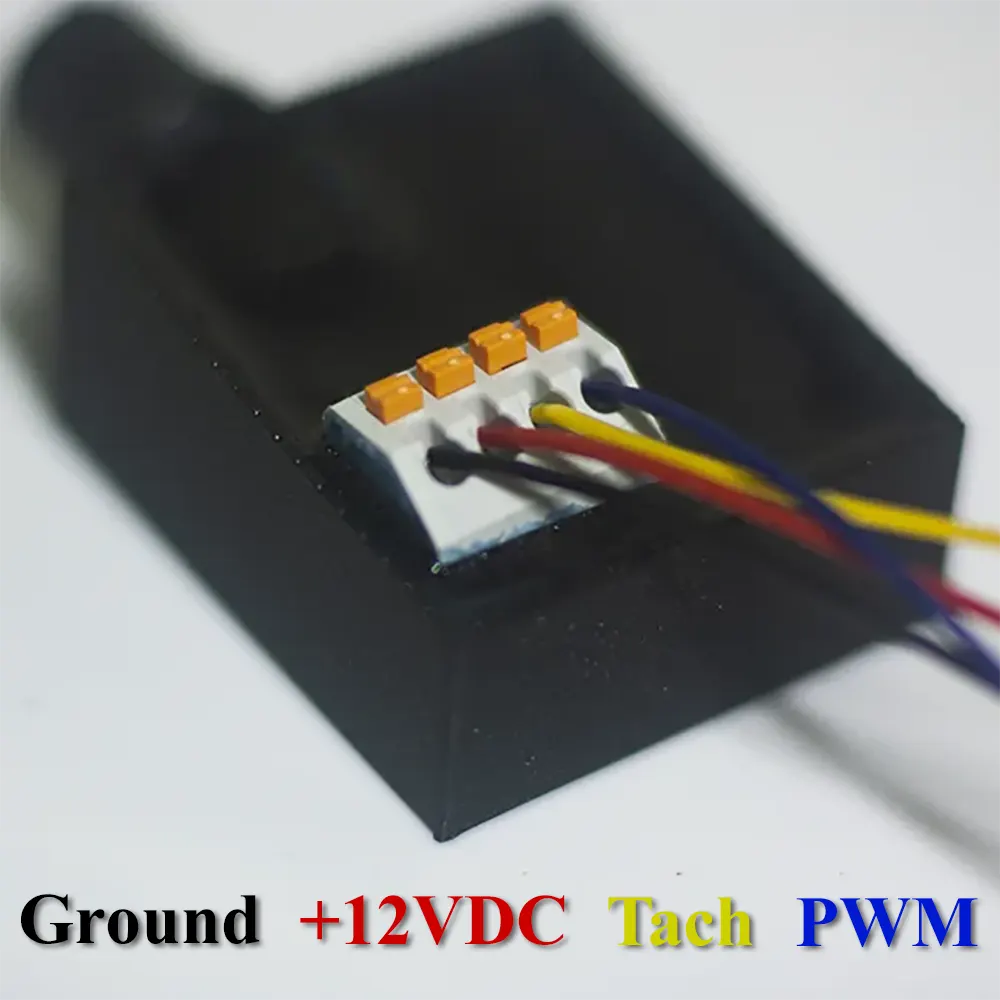
- The PWM Module has orange buttons that release a spring slot for the wire to slide into. Wire the fan leads into the PWM module as shown - from left to right: black (negative), red (positive), yellow (signal), and blue (pwm).
- Take off the hex nut and washer then slide the module into the housing.
- Place the washer and hex nut back onto the rotary knob from outside the housing. Secure the hex nut with the 3D printed hex tool. Finally, slide the cover onto the rotary knob.
Mounting The Fan
- Place the four hex nuts into the slots on the front of the fan mount as shown.
- Orient the fan with the label towards the rear of the air cleaner - the air comes out this side. If you want to double check, you can plug the fan in to determine the correct orientation. If the fan leads are too long, you can trim them down or rotate the fan 90°.
- Place the four long screws into the fan and into the mounting holes. Do not overtighten the screws as it can bend the plastic. The plastic won't break but it will result in misalignment of the front lid's screw mount.
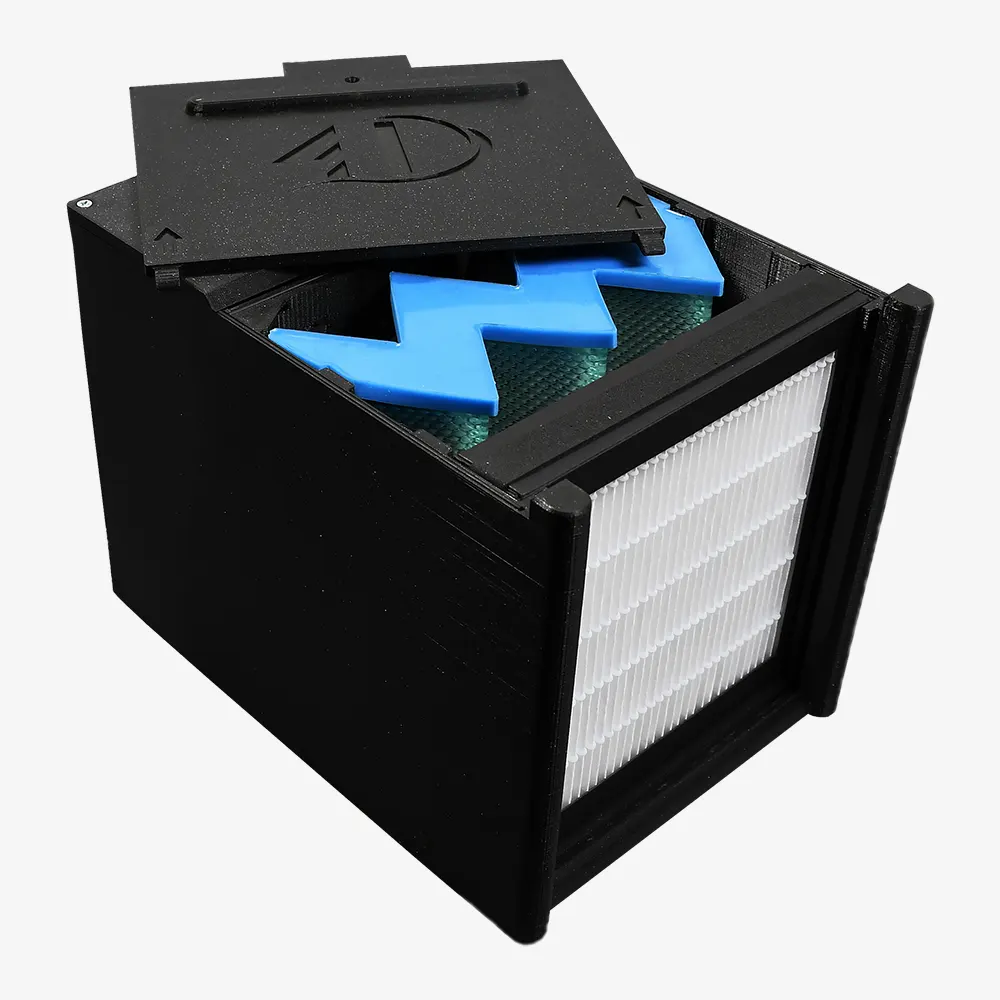
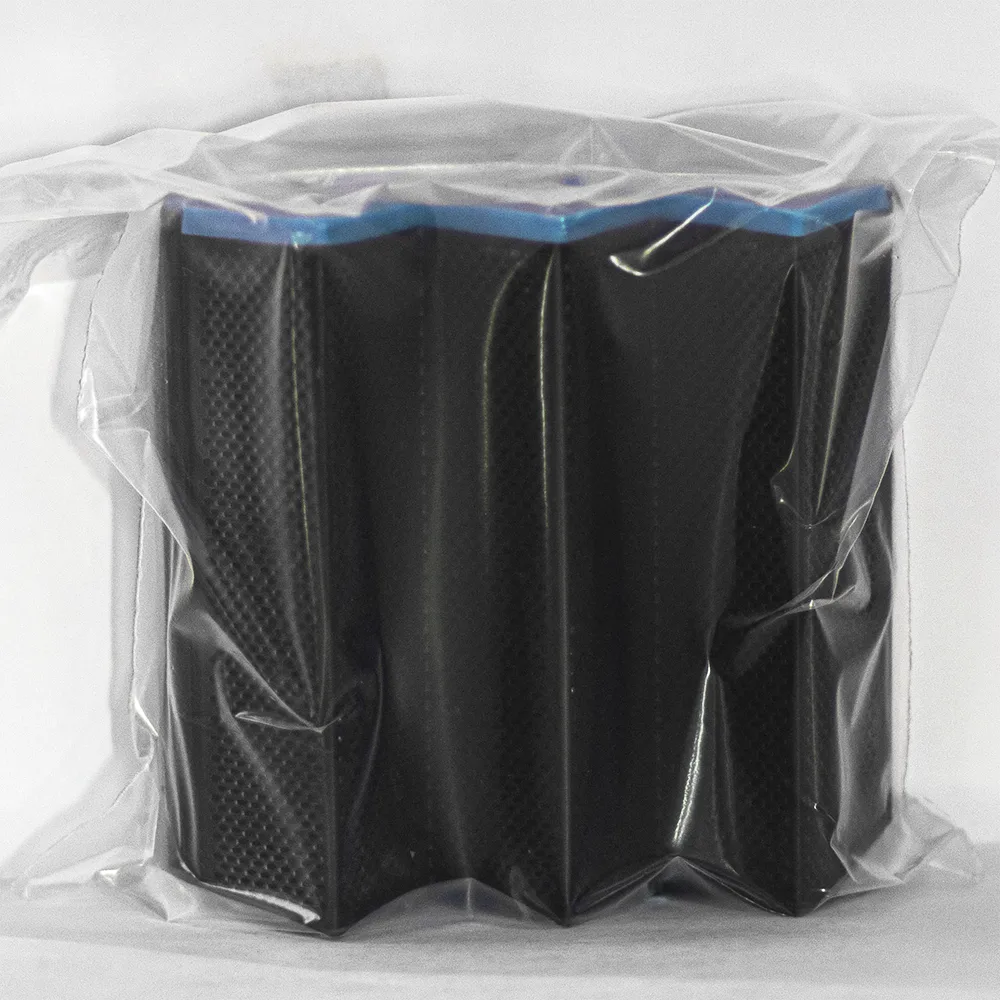
Filling The Carbon Cartridge
- Take the cartridge and fill it up with carbon using the funnel or straight out of the bag. All of the holes should be covered with carbon. You can place a paper towel or plate under the cartridge while filling in case some carbon spills.
- Place the silicone seal on top of the cartridge walls and make sure the corners are flush.
- Slide the carbon cartridge into the rear slot of the housing. The activated carbon will capture a reasonable percentage of 'resin fumes' and VOCs from FDM printers.
Particulate Filter
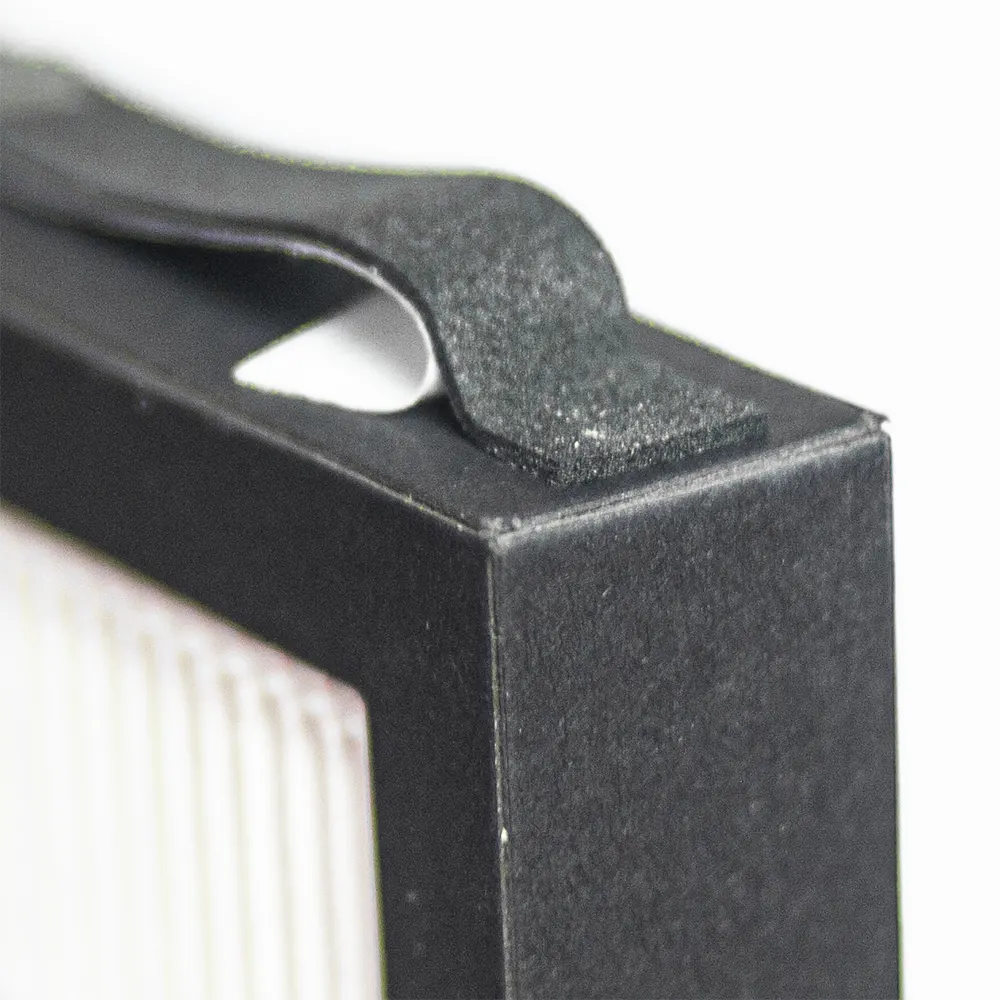
- After removing the filter from the packaging, take the adhesive-backed foam strip and wrap it around the filter. Tear off any excess foam.
Filter Layout
- Typically, it is recommended to place the MERV 13 or HEPA 13 filter in front of the carbon to increase its lifespan. This ideal for general use.
- When the fume extractor is inside or connected to an enclosure, the carbon can be placed in front of the particulate filter. This will ensure that any dust released from the carbon will be captured by the particulate filter.
Finishing Up
- Place the two grates into the front and rear slots.
- Take two of the short screws and secure the rear lid.
- The third screw for the front lid is optional but will absolutely prevent it from opening.
- Plug in your 12 V AC-DC power adapter and you are good to go!
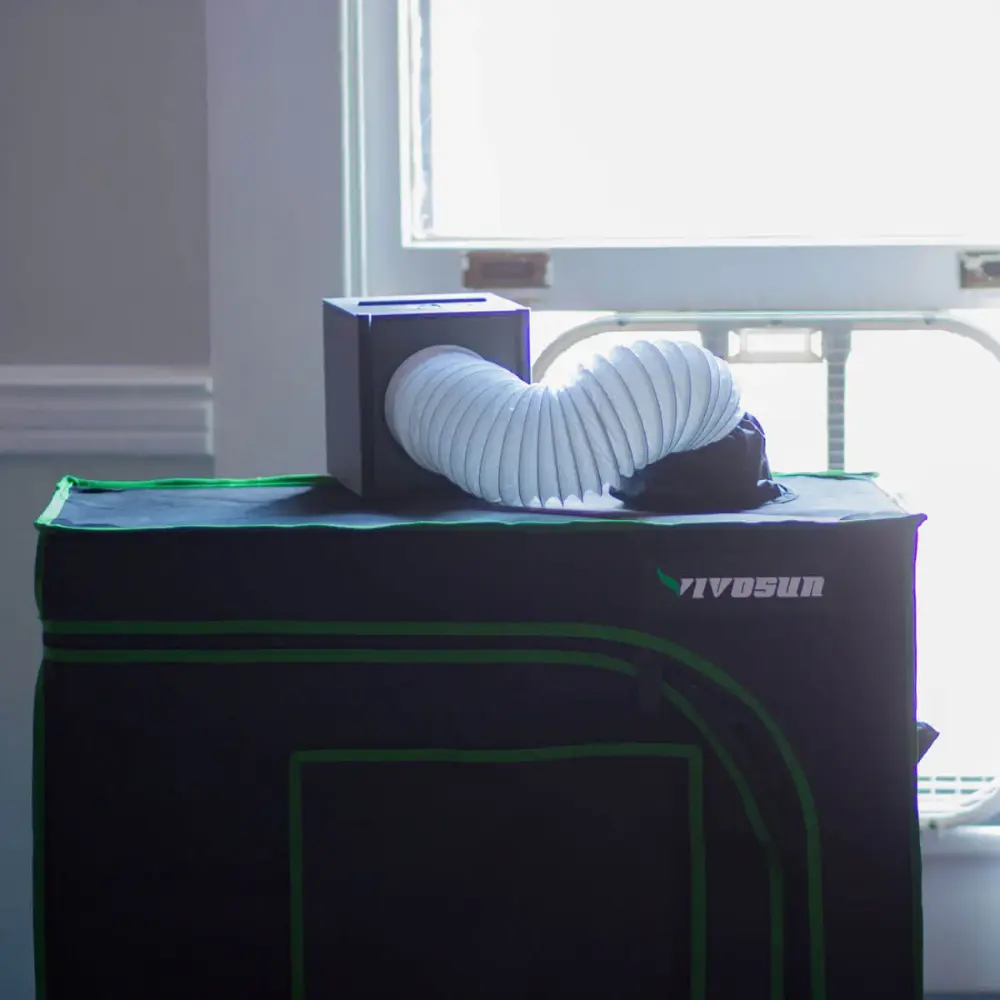
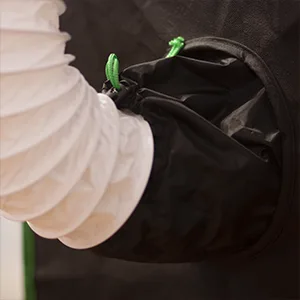
Optional: Duct Hose
- Cheap duct hose is typically made of vinyl and should not be used for high-temperature applications. Heat-resistant and metal duct hose should be used for this.
- The grate duct adapter can replace the front grate. The duct hose can be slid over this adapter and secured with a zip tie. Trim down the zip tie.
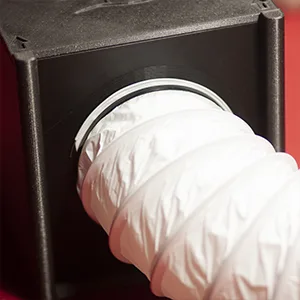
- The other end of the duct should be hooked up to the printed external adapter, your own custom adapter, or any standard 4" duct attachment. The duct can be hooked up to grow tents.
Experimental: Single Slot Carbon Cartridge
- The optimized carbon cartridge is pleated, thus it must be printed with resin. This single slot version is intended to be printed on a FDM printer. While this version will work, it will result in a lower process rate and efficiency.
- After the three pieces are printed, adhesive should be placed on one half before pressing/clamping the two sections together.

- Fill the cartridge with carbon, covering all of the mesh.
- Bend the lid into the cartridge and place the assembled component into one of the air cleaner slots.
New User Checklist
If there is any damage during shipping or if an excess amount of carbon spills out of the cartridge, please let us know. Feedback allows us to improve the experience in the future.
- Remove the center screw from the top lid and slide the lid back - do not lift up. This screw is optional since the lid is magnetic.
- Remove the particulate filter from the packaging. Peel off the adhesive backing from the foam and wrap it around the filter frame. Tear or cut off any excess foam. Place the filter in the front slot.
- The carbon cartridge is prefilled, and you only need to carefully remove the rubber bands.
If some carbon spilled into the bag during shipping, you can simply place it back into the cartridge.
When you need to refill the cartridge, you can fold a piece of paper into a funnel to assist in pouring. All of the holes should be covered with carbon. You can place a paper towel or plate under the cartridge while filling in case some carbon spills.
Slip the silicone seal back onto the cartridge, making sure the corners are flush. Place the cartridge into the rear slot. - Slide the lid back on - use the screw if you wish. Plug the power in and turn the knob to adjust the speed. You're good to go!
- If you wish to use duct, replace the front grate with the appropriate adapter. Slide the duct over the adapter and secure it with a zip tie. Use clippers or scissors to trim the tie down.
The other end of the duct can be attached to a grow tent, a standard 4" connection, a custom adapter, or the provided external adapter (which can be screwed or glued onto an enclosure, panel, or wall).
Disclaimer: You assume all responsibility and risk for the use of, but not limited to, the resources, advice, and opinions of 4D Filtration or its employees. 4D Filtration or its employees do not assume any liability or create any warranty for the use of any information. 4D Filtration may receive commissions for referral links. Prices are approximated for simplicity and they may fluctuate due to sales or markdowns. Amazon .com should refer you to your local amazon site if you are not in the United States; there is a chance Amazon's link redirect system will take you to a different product.